· updated · by skunxicat
On this page
Disposable Cloud Proxies in One Command
Updated for v3 (September 2026). The module now runs the proxy inside a single-instance Auto Scaling Group instead of a standalone EC2 instance. This removed the state drift that
ttl_hoursused to cause, and let IP rotation happen by scaling rather than a full re-apply. Spot support was dropped (it was never interruption-safe, and on-demand at this tier is a rounding error). If you’re pinned to~> 2.5, the old standalone behaviour still works; this article describes~> 3.0.
The Problem
You need to make HTTP requests from a different IP address. Maybe you’re collecting public data and want it coming from a clean, separate source IP rather than your office network. Maybe you’re testing how your firewall rules behave against traffic from cloud ranges. Maybe you’re validating that a geo-restriction actually works. Or maybe you just need a quick proxy to avoid leaking your real IP during research.
The solutions on the table are all annoying:
- Commercial proxy services often involve monthly subscriptions, shared IP pools, and trusting a third party with your traffic.
- VPN providers solve a different problem (privacy for browsing), and their IPs are widely flagged.
- Manual EC2 setup works, but takes 15 minutes of clicking through the console, configuring security groups, installing software, and — worst of all — remembering to terminate the instance when you’re done.
What you actually want is: run one command, get a proxy URL with a fresh public IP, use it, destroy it, pay fractions of a cent.
The Solution
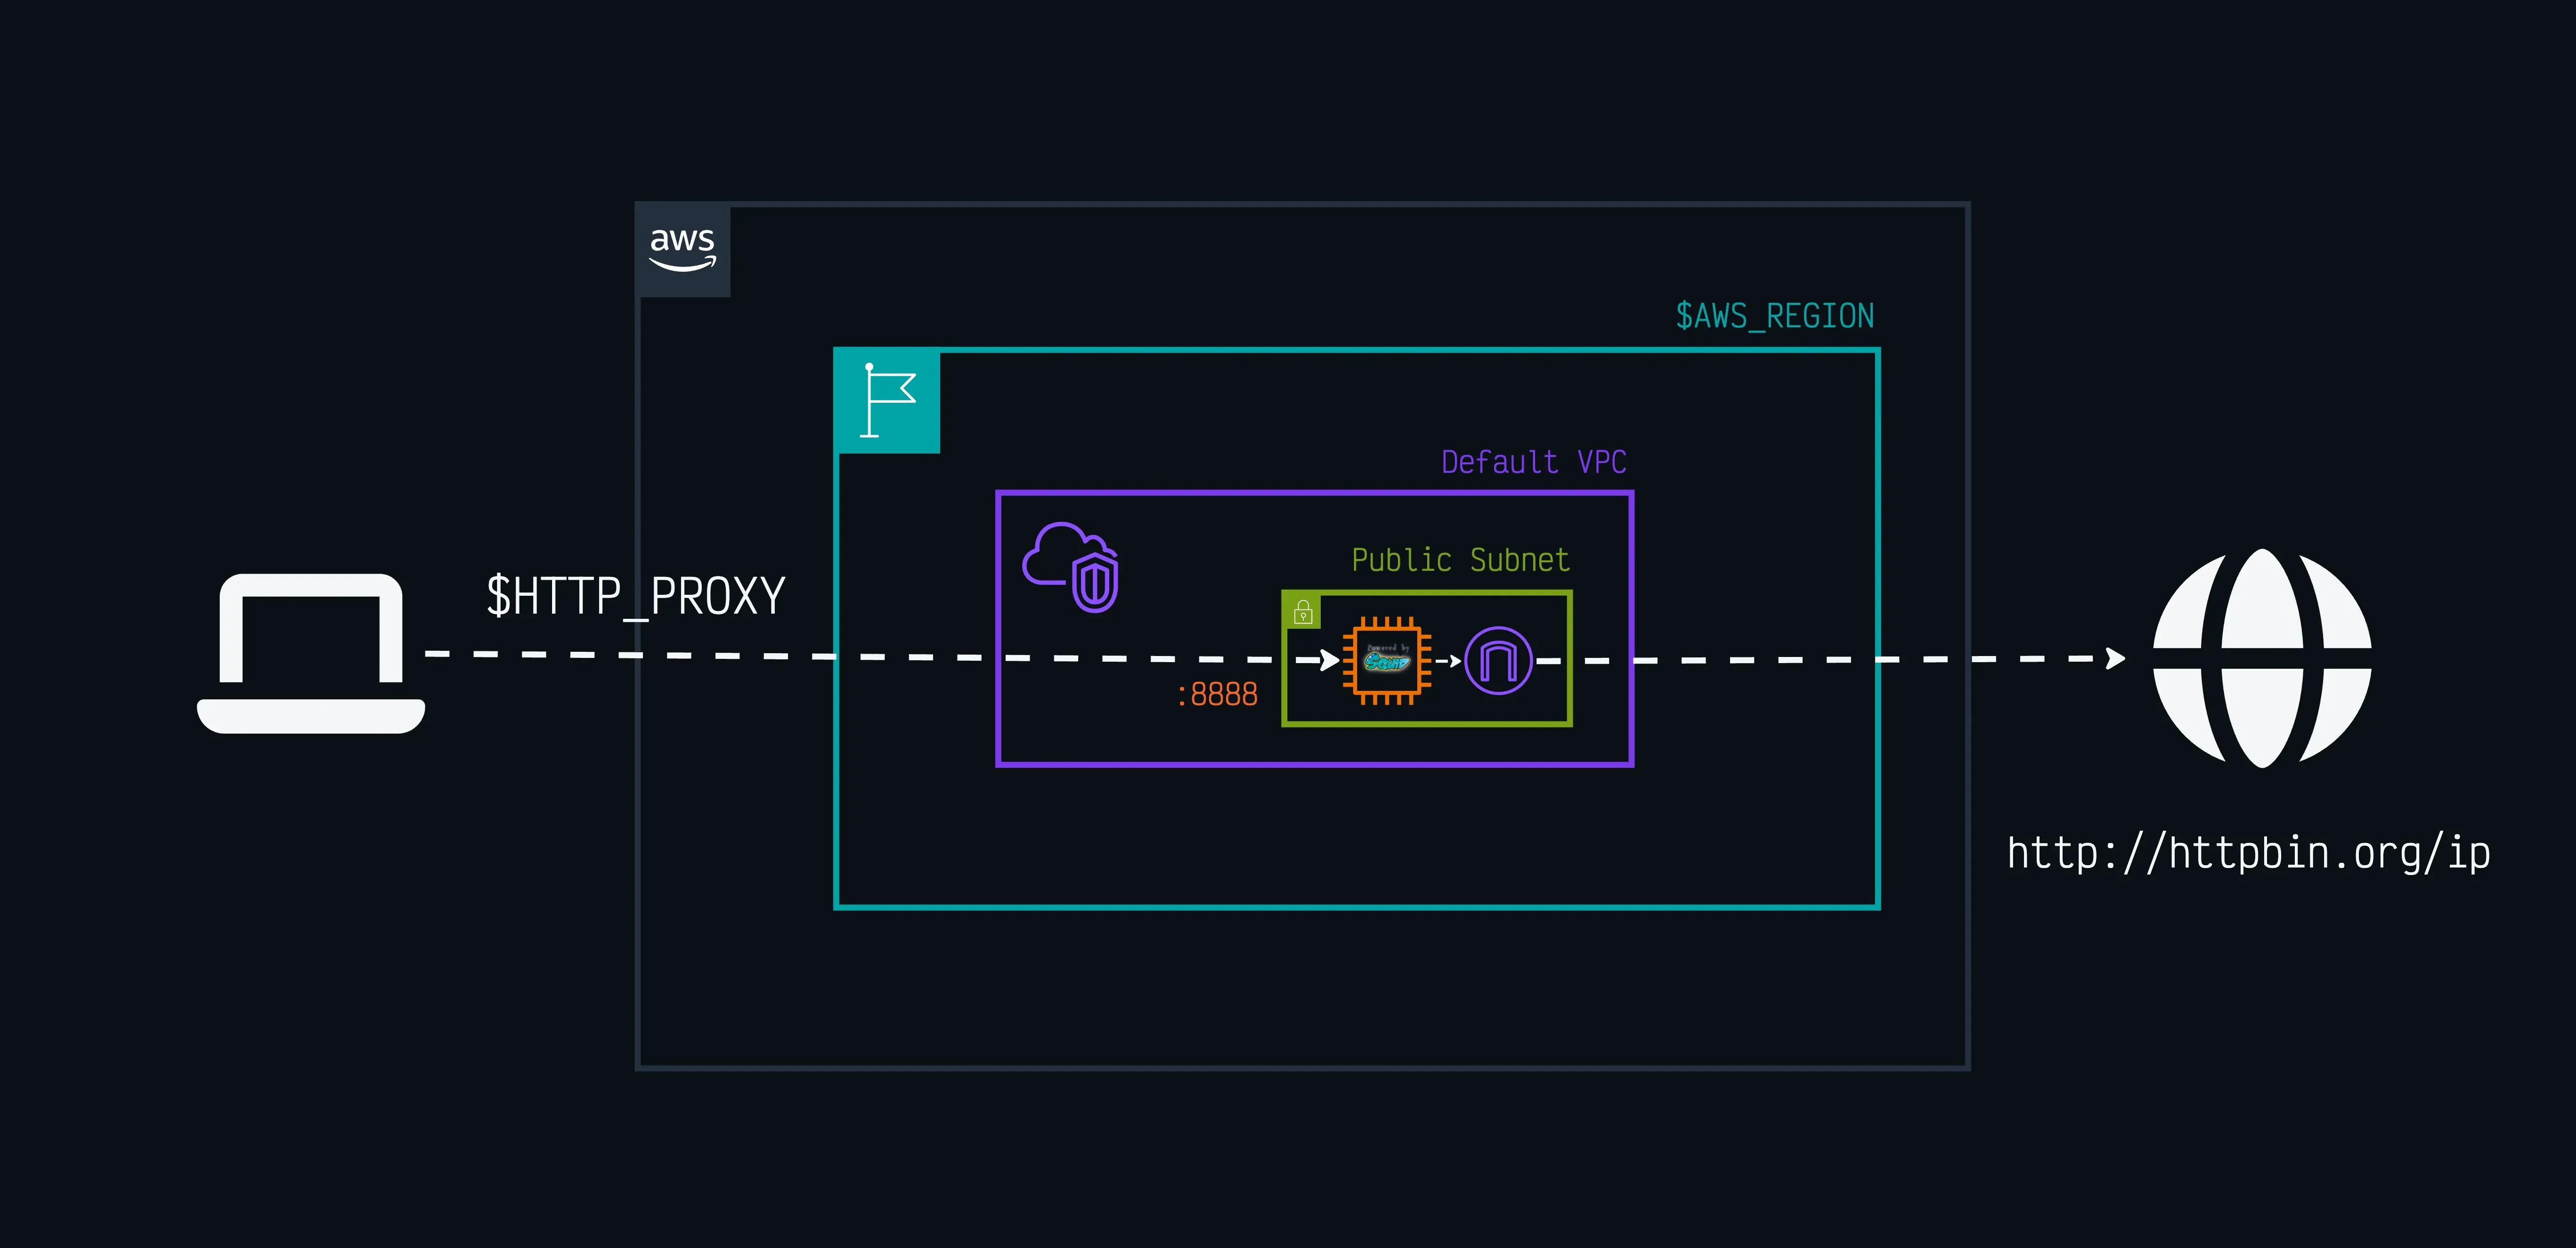
terraform-aws-ec2-proxy is a Terraform module that codifies the “disposable cloud proxy” pattern into a single operation. It provisions a Squid forward proxy on an on-demand EC2 instance managed by a single-node Auto Scaling Group, and costs about a cent an hour to run.
It’s available on the Terraform Registry:
module "proxy" {
  source  = "ql4b/ec2-proxy/aws"
  version = "~> 3.0"

  namespace = "myorg"
  name      = "proxy"
}
terraform init && terraform apply
# The instance is ASG-managed, so its IP isn't a Terraform output --
# resolve it live by the module's ownership tag:
IP=$(aws ec2 describe-instances \
--filters "Name=tag:proxy:managed-by,Values=myorg-proxy" \
"Name=instance-state-name,Values=running" \
--query 'Reservations[].Instances[].PublicIpAddress' --output text)
export HTTP_PROXY="http://$IP:8888"
curl http://httpbin.org/ip # shows the proxy's IP, not yours
terraform destroy # done, no residual costEvery deploy — or every scale-from-zero — gives you a new public IP. No monthly bills, no forgotten instances, no infrastructure to maintain.
If typing that
describe-instancesisn’t your idea of fun, the cloudless-proxy wrapper (below) turns the whole lifecycle intoproxy up/proxy url/proxy down.
How It Works
The module deploys a minimal stack into your AWS account’s default VPC (or a VPC you specify):
-
A single-node Auto Scaling Group (
min 0,max 1,desired 1) backed by a launch template. It runs onet4g.nanoARM64 on-demand instance on Amazon Linux 2023 — ARM64 (Graviton) gives the best price-performance at this tier. Running it as an ASG rather than a bare instance is the key v3 change: Terraform manages the group (a stable contract), and the instance underneath can come and go without ever showing up as state drift. -
Squid installed via user_data at boot. No custom AMIs, no Docker, no external dependencies — just
dnf install squidfrom the AL2023 repos. The proxy is ready within 30-60 seconds of launch. -
A security group that allows inbound traffic on the proxy port (default: 8888) only from your IP. When you don’t specify CIDRs, the module calls
checkip.amazonaws.comat plan time and locks ingress to your current public IP.The proxy speaks plain HTTP (not HTTPS) between your client and the proxy itself. This is standard for forward proxies — HTTPS CONNECT tunneling still works for reaching HTTPS destinations, but the proxy listener is unencrypted. For local or trusted-network use this is fine. If you’re connecting over the public internet and want an encrypted tunnel to the proxy, use SSM port forwarding instead.
-
An IAM role with SSM access so you can debug via
aws ssm start-sessionif needed. No SSH key pairs, no port 22.
That’s the entire footprint. No load balancers, no NAT gateways, no persistent storage, no VPN tunnels. (When you set a TTL, the module also adds a small EventBridge rule + Lambda — see below.)
Security by Default
A proxy is sensitive infrastructure — it forwards traffic on your behalf. The module takes a secure-by-default stance:
- Auto-detected ingress restriction. If you don’t explicitly specify allowed CIDRs, nobody but you can reach the proxy. The security group is locked to your IP at plan time.
- IMDSv2 enforced. The instance metadata service requires session tokens, blocking the most common SSRF attack vector for credential theft.
- No SSH. There are no key pairs and no port 22. Access is through AWS Systems Manager only, which provides audit logging and doesn’t require inbound ports.
- Encrypted root volume. EBS encryption is enabled by default.
- Optional basic authentication. Set
proxy_usernameandproxy_passwordto add an HTTP basic auth layer. - Privacy headers. Squid is configured with
via offandforwarded_for delete, so it doesn’t leak your identity to upstream servers.
Use Cases
Data collection from a clean source IP. When you’re pulling public data and don’t want it originating from your office or home IP — to keep that address off shared abuse lists, or to separate automated traffic from your personal browsing — route the requests through a disposable proxy and tear it down when you’re done. Respect the target’s terms of service and robots.txt; this is a networking tool, not a license to ignore them.
Testing rate limits. If you’re building a rate-limiting system, you need to verify it works against real distributed traffic. Spin up proxies in different regions and hit your endpoint through each one.
Firewall rule validation. You’ve added a CIDR block to your WAF or security group — does it actually block traffic from those ranges? Deploy a proxy in the cloud and test from outside your network.
Avoiding IP reputation issues. Your office IP got flagged by an overzealous abuse detection system. Rather than fighting with support, route specific requests through a disposable proxy while you sort it out.
Quick privacy for one-off requests. Sometimes you just want to make a few requests without exposing your real IP. This is faster and more trustworthy than a random free proxy list.
SERP and AI search testing. Search results and AI-generated answers can vary by geography and network origin. Launch the proxy in another AWS region, route the request through it, compare the result, then let the instance disappear when the TTL expires. This is not a residential proxy and should not be treated as one; it is a cheap cloud vantage point for controlled testing.
                        ┌───────────────┐
              ┌────────▶│ us-east-1     │────▶ SERP (US)
              │         │ 3.92.x.x:8888 │
┌──────────┐  │         └───────────────┘
│          │──┤
│ Your     │  │         ┌───────────────┐
│ machine  │  ├────────▶│ eu-west-1     │────▶ SERP (EU)
│          │  │         │ 52.18.x.x:8888│
└──────────┘  │         └───────────────┘
              │
              │         ┌────────────────┐
              └────────▶│ ap-southeast-1 │────▶ SERP (Asia)
                        │ 13.212.x.x:8888│
                        └────────────────┘

         terraform apply     compare results     terraform destroy
         (per region)        (different IPs)     (no residual cost)
Auto-Termination: No Forgotten Instances
The most common failure mode with cloud proxies is forgetting to shut them down. The module solves this:
module "proxy" {
  source  = "ql4b/ec2-proxy/aws"
  version = "~> 3.0"

  namespace = "myorg"
  name      = "proxy"
  ttl_hours = 2
}
Set ttl_hours and the instance self-terminates after that duration via shutdown -h. In v3 the ASG makes this clean: when the instance begins shutting down, an EventBridge rule fires a small Lambda that sets the group’s desired capacity to 0 — so the ASG doesn’t relaunch a replacement, and because the module ignores desired_capacity in Terraform, none of this registers as state drift. The proxy simply parks itself at zero cost until you scale it back up.
This is the whole reason for the v3 redesign. In v2, ttl_hours terminated a Terraform-managed instance, which meant the next plan showed drift (Terraform still thought the instance existed). Managing an ASG instead of an instance makes self-termination a first-class, drift-free operation. The EventBridge rule and Lambda only exist when ttl_hours is set — an always-on proxy has neither.
Cost
A running proxy in us-east-1 costs about $0.01/hour: $0.0042 for the t4g.nano on-demand instance, $0.005 for its public IPv4 address (AWS has charged for every public IPv4 since 2024, and here it costs more than the instance), and roughly $0.001 for the 8 GB gp3 root volume. That’s:
- About a cent for a typical short session
- About $7/month if somehow left running 24/7 (which the TTL and scale-to-zero prevent)
- Effectively free for the “deploy, use, destroy” — or “scale up, use, scale to zero” — workflow
There’s no minimum commitment, no idle cost when scaled to zero or destroyed (the instance, its IP and its volume go away together), and no data transfer charges for the proxy itself (only standard AWS egress applies to your actual traffic).
Getting Started
Prerequisites:
- Terraform >= 1.0
- An AWS account with a default VPC, or an existing VPC and public subnet
- AWS credentials configured
Simplest deployment:
module "proxy" {
  source  = "ql4b/ec2-proxy/aws"
  version = "~> 3.0"

  namespace = "myorg"
  name      = "proxy"
}

output "asg_name" {
  value = module.proxy.asg_name
}
With authentication and TTL:
module "proxy" {
  source  = "ql4b/ec2-proxy/aws"
  version = "~> 3.0"

  namespace      = "myorg"
  name           = "proxy"
  proxy_username = var.proxy_username
  proxy_password = var.proxy_password
  ttl_hours      = 4
}
With explicit CIDRs (for shared use):
module "proxy" {
  source  = "ql4b/ec2-proxy/aws"
  version = "~> 3.0"

  namespace     = "myorg"
  name          = "proxy"
  allowed_cidrs = ["203.0.113.0/24", "198.51.100.10/32"]
}
With a custom VPC (when the default VPC is missing):
module "proxy" {
  source  = "ql4b/ec2-proxy/aws"
  version = "~> 3.0"

  namespace = "myorg"
  name      = "proxy"

  vpc_id    = "vpc-abc123"
  subnet_id = "subnet-def456"   # must be a public subnet
}
Some regions (or locked-down accounts) don’t have a default VPC. Pass vpc_id and subnet_id to deploy into any existing public subnet. The subnet needs a route to an internet gateway — the module sets associate_public_ip_address = true so the instance always gets a public IP.
Design Philosophy
The module optimizes for disposability over durability:
- Stateless. The proxy caches nothing meaningful. Reprovisioning is the upgrade path.
- Zero pre-existing infra. Works in any AWS account with a default VPC — or bring your own VPC and public subnet. No Terraform state backends to configure, no network setup.
- Single-purpose. It’s a forward proxy, not a VPN, not a bastion, not a NAT gateway. One job, done well.
- Minimal blast radius. A single
t4g.nanoon-demand instance in a max-size-1 ASG, with a TTL and a locked security group, is about as low-risk as cloud infrastructure gets.
If you need high availability, load balancing, or a persistent proxy fleet, this isn’t the right tool. It’s for the cases where you need a fresh IP for a few hours, want it in one command, and don’t want to think about it again.
Just Want a Proxy? Clone and Go
The Terraform module is designed for composition — embedding in larger infrastructure stacks. But if you just want a working proxy without writing any Terraform yourself, there’s a companion repo: cloudless-proxy.
It wraps the module with a .env config file and a proxy CLI that handles the entire lifecycle:
git clone https://github.com/ql4b/cloudless-proxy.git
cd cloudless-proxy
cp .env.example .env   # set your AWS profile and region
source activate
proxy up               # deploy
eval $(proxy env)      # export HTTP_PROXY into your shell
From there:
| Command | What it does |
|---|---|
proxy up | Deploy the proxy, wait until it’s actually serving |
proxy down | Destroy it |
proxy scale-up / scale-down | Hand out a fresh proxy / park it at zero cost (keep the scaffolding) |
proxy recreate | Terminate + relaunch for a fresh IP |
proxy status | Region, instance, URL, ASG capacity, TTL |
proxy url | Print the live proxy URL |
proxy test / env | Verify it’s working / print export statements for your shell |
No Terraform knowledge required beyond cp .env.example .env and editing two values. The wrapper resolves the live instance by tag, waits until Squid is actually answering before returning, and (in v3) lets you scale-down to zero between uses instead of a full destroy — bringing a fresh IP back with scale-up.
Power user: MITM inspection
Chain the cloud proxy with mitmproxy to inspect HTTPS traffic flowing through it:
┌──────────────┐     ┌──────────────┐     ┌──────────────┐
│ Browser/curl │────▶│  mitmproxy   │────▶│ Squid (EC2)  │────▶ Target
│              │     │ 127.0.0.1    │     │ 3.92.x.x     │
│              │◀────│  :8080       │◀────│  :8888       │◀────
└──────────────┘     │ inspect      │     │ cloud IP     │
                     └──────────────┘     └──────────────┘
                      your machine         AWS region
proxy up
eval $(proxy env)
# mitmproxy listens locally, forwards upstream through the cloud proxy
mitmproxy \
--mode upstream:$HTTP_PROXY \
--listen-host 127.0.0.1 \
--listen-port 8080 \
--ssl-insecure
# In another terminal, point your browser or curl at localhost:8080
curl --proxy http://127.0.0.1:8080 https://example.comYou get full request/response inspection with the traffic appearing to originate from the proxy’s cloud IP. Useful for debugging API behaviour that varies by source IP, or verifying that the proxy strips the headers it claims to.
Related
- Terraform Modules Best Practices — the module design principles behind this and other cloudless modules
- Composable Infrastructure — how single-purpose modules compose into full systems
Links
- Terraform Registry: registry.terraform.io/modules/ql4b/ec2-proxy/aws
- Source: github.com/ql4b/terraform-aws-ec2-proxy
- Standalone wrapper: github.com/ql4b/cloudless-proxy — clone, configure,
proxy up - Examples: examples/ directory with simple, authenticated, restricted, ephemeral, and custom-vpc configurations